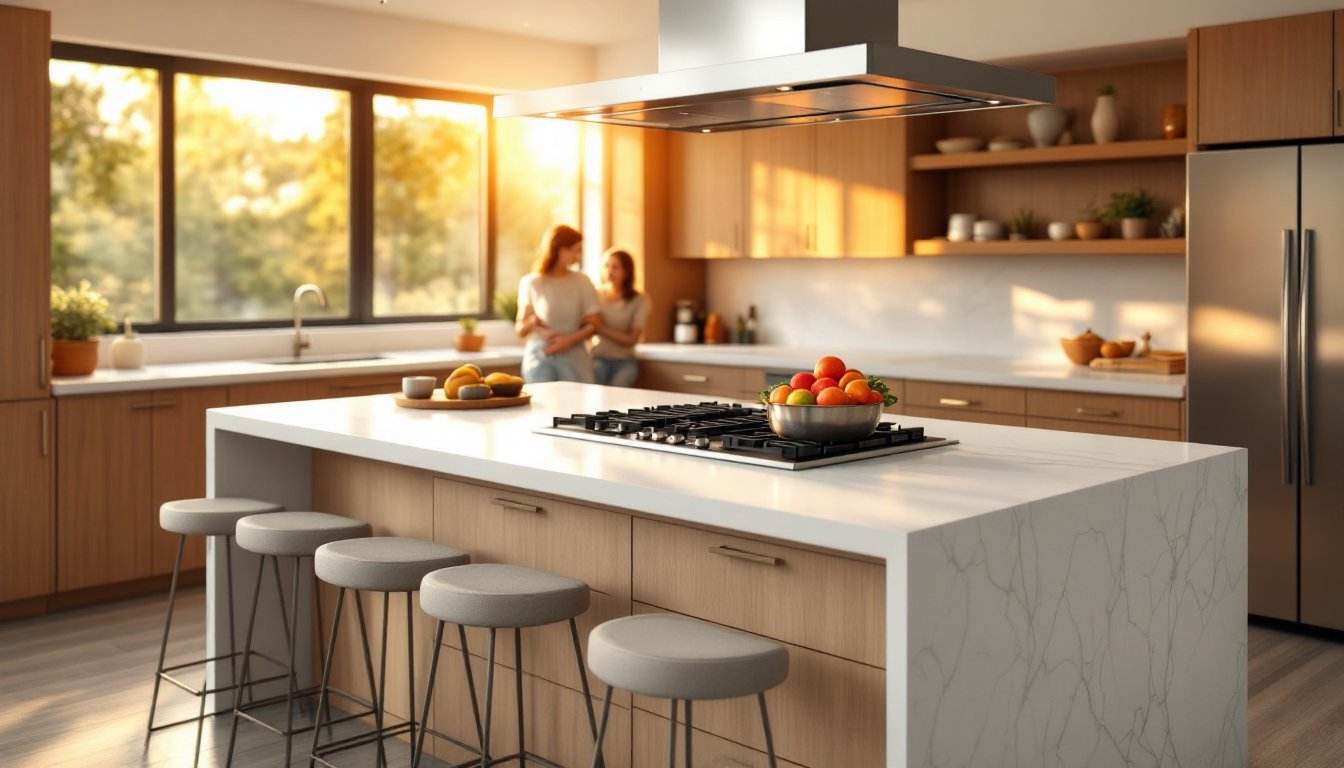
An island with a built-in stove has become the centerpiece of modern kitchens, combining cooking functionality with social space in one bold move. Homeowners are drawn to open concept kitchen islands with stoves because they eliminate walls, improve traffic flow, and create a natural gathering spot for family and guests. Unlike traditional kitchens where the cook was isolated, these islands keep everyone connected while meals come together. The trend reflects how homes have evolved, kitchens are no longer hidden away but instead serve as the heart of the home. If you’re planning a renovation or new build, understanding the design, ventilation, and installation requirements will help you make the right choices for your space and lifestyle.
Table of Contents
ToggleKey Takeaways
- An open concept kitchen island with a stove transforms cooking into a social experience by keeping the cook connected with family and guests, eliminating the isolation of traditional kitchen layouts.
- You’ll need at least 1,000 square feet of kitchen space and a minimum island size of 3 feet by 6 feet to safely accommodate a cooktop with 36 inches of clear walkway on all sides.
- Ventilation is non-negotiable for an island stove setup; overhead hoods are generally more effective than downdraft systems and should match or exceed your cooktop width with proper CFM (600–900 CFM) ductwork sizing.
- Plan your island’s infrastructure carefully—gas lines, electrical circuits, and drainage require structural planning with a professional, as this is not a surface-level retrofit for existing kitchens.
- Match barstool heights to your island counter (24-inch stools for 36-inch counters, 30-inch stools for 42-inch counters) and leave at least 15 inches from the counter edge to backrests for comfortable seating.
- Work with professionals, pull permits, and complete thorough design planning before installation to ensure your island stove addition complies with building codes and delivers both functionality and lasting value.
Why Choose an Island With a Built-In Stove
An island stove pulls the cooking action into the center of your kitchen, transforming how you interact with food prep and your family. You’re no longer facing a wall while family members sit at the dining table, instead, you can cook while maintaining eye contact and conversation. This layout also improves efficiency. A stove at the island can reduce the number of steps needed during meal prep, especially if you position seating on one side and work surfaces on the other.
The social aspect shouldn’t be underestimated. A countertop cooktop becomes an informal gathering point where kids can watch you cook, guests can chat while you finish dinner, and the whole household stays connected. From a design perspective, it signals confidence and openness in your home’s layout. The island itself becomes a design anchor, a statement piece that defines the kitchen’s aesthetic and workflow. But, this setup requires thoughtful planning around ventilation, electrical runs, and gas lines, so it’s not a retrofit you can easily add to an existing kitchen without professional help.
Layout and Space Considerations for Island Stoves
You’ll need at least 1,000 square feet of kitchen floor space to comfortably accommodate an island with a cooktop, and ideally more if you want good traffic flow and seating. The island itself should be a minimum of 3 feet by 6 feet to safely house a cooktop and allow counter space for prep work on either side. Most building codes require at least 36 inches of clear walkway on all sides of the island: if you’re in a tight space, that margin shrinks your working zone.
Consider your work triangle carefully. Traditionally, kitchens balance the sink, stove, and refrigerator to minimize steps. With an island stove, that triangle expands, but the trade-off is that you’ve centralized cooking, which can improve workflow if the rest of your layout supports it. Measure your kitchen carefully and mark out the island footprint with painter’s tape before committing to dimensions. Factor in where doors swing, where stools will sit, and whether your appliance, whether a 36-inch or 48-inch range or cooktop, leaves enough counter overhang (typically 12 to 15 inches) for safe seating.
Electrical and plumbing infrastructure is a hidden cost. Gas lines, electrical circuits, and potentially a drain line must run beneath the island, which means structural planning with a kitchen designer or contractor. This isn’t a surface-level decision, it shapes your entire kitchen budget and timeline.
Ventilation Solutions for Cooktop Islands
Ventilation is the non-negotiable piece of an island stove setup, and it’s also the most visible. You’ll need to remove steam, smoke, and cooking odors, which on an island means either an overhead hood or a downdraft ventilation system. Overhead hoods are most common and generally more effective, they capture rising heat and moisture. An island hood requires ductwork that runs above the ceiling (which may need framing adjustments in two-story homes) or through a soffit.
Downdraft systems pull air downward through the cooktop and duct it out through the floor or wall. They’re sleeker visually but less efficient than overhead hoods and tend to cost more upfront. If you choose an overhead hood, decide whether you want a range hood, a wall-mounted hood with flexible ductwork, or a custom island chimney that becomes an architectural feature. A good hood should be at least as wide as your cooktop, and your ductwork should be sized for your hood’s CFM (cubic feet per minute) rating, typically 600 to 900 CFM for an island cooktop.
Ductless or recirculating hoods filter air but don’t remove it entirely: they’re a compromise if ductwork is impossible, though building codes may require venting in some jurisdictions. Always check your local building codes, ventilation standards vary. A professional HVAC installer or kitchen designer can help you choose the right system for your space and ensure proper ductwork sizing and exit routing.
Design Styles and Aesthetic Options
The island’s design should complement your kitchen’s overall aesthetic while remaining functional. A minimalist kitchen might feature a low-profile induction cooktop with a sleek, handle-free hood and waterfall edge countertops. A farmhouse or transitional kitchen could showcase a vintage-inspired range with a decorative range hood, open shelving, and warm wood tones. An industrial style pairs stainless steel appliances and hoods with concrete or raw metal accents. Kitchen design inspiration abounds on sites like Houzz, where you can browse island configurations and visualize how different materials and finishes feel in context.
Countertop materials matter both aesthetically and functionally. Quartz and granite are durable and heat-resistant: butcher block adds warmth but requires sealing near the stove: stainless steel is commercial-grade but shows fingerprints. The overhang on the seating side, typically 12 to 15 inches, should be comfortable for bar-style seating without trapping knees. Choose barstool height based on your counter height: for a 36-inch counter, use 24-inch stools: for a 42-inch counter, use 30-inch stools.
Storage beneath the cooktop is limited (you need clearance for gas lines or electrical), so plan open shelving, drawers on the sides, or a hybrid approach. Design sources like Remodelista showcase curated kitchen solutions that balance form and function, helping you visualize materials and layouts before committing to them. Lighting above the island, whether pendant lights, a chandelier, or recessed fixtures, should be bright enough for task lighting without glare reflecting off the cooktop.
Maximizing Functionality With Seating and Storage
Seating transforms an island from a work surface into a social hub. Barstool seating on one side lets family members gather while you cook without stepping into the work zone. Leave at least 15 inches from the counter edge to the stools’ backrest, cramped seating feels claustrophobic. If your island has a standard 36-inch height, match it with 24-inch barstool heights. For a taller 42-inch island (ideal if you want standing counter space on both sides), pair 30-inch stools. Swivel or rolling stools offer flexibility but fix ones provide stability.
Storage below the cooktop is limited because of gas lines, electrical runs, and ventilation requirements, but you can maximize it on the sides and ends. Open shelving on one end stores cookbooks or decorative pieces: drawers on the opposite side keep utensils, linens, and small appliances accessible. Closed cabinetry on at least one side hides less attractive items. If the island has a sink, that side naturally becomes the cleanup zone: pair it with a single-bowl undermount sink and low-profile faucet to avoid hitting your head when seated nearby.
Consider adding a beverage cooler, wine fridge, or warming drawer to enhance entertaining. These built-in appliances add function and luxury but require their own electrical circuits and planning. Resources like The Kitchn offer practical organizing tips and real kitchen tours that show how successful island layouts handle storage and workflow in small and large spaces. Space efficiency at an island stove means every square inch should earn its place, so plan storage and seating before ordering cabinetry.
Conclusion
An open concept kitchen island with a stove is a substantial but rewarding investment that reshapes how your household lives. It demands careful planning, proper ventilation, adequate electrical infrastructure, code compliance, and thoughtful layout, but the payoff is a kitchen that’s both functional and socially connected. Work with professionals, pull permits, and don’t rush the design phase. A well-executed island stove becomes the heart of your home and a feature that adds real value for years to come.