Your Nest thermostat is one of those smart home devices that quietly keeps your home comfortable, until the battery warning pops up on your phone. A dying battery in your Nest thermostat doesn’t mean a costly service call: it’s a straightforward DIY fix that takes maybe five minutes and costs just a couple dollars. Whether you’re a first-time DIYer or a seasoned homeowner, replacing the battery is simple enough to tackle solo, no special tools required. This guide walks you through the process, troubleshooting common issues, and keeping your thermostat running reliably for years to come.
Table of Contents
ToggleKey Takeaways
- Nest thermostat battery replacement is a simple 5-minute DIY fix requiring only a non-rechargeable AA lithium battery and no special tools.
- Watch for low-battery notifications on the Nest app, red lights on the device, or Wi-Fi disconnections—signs that battery replacement is needed before the thermostat loses power entirely.
- Always use a non-rechargeable AA lithium battery like Energizer Ultimate Lithium, never alkaline or rechargeable batteries, and ensure the positive terminal faces outward during installation.
- After battery replacement, verify the battery status shows 100% in the app’s Settings menu, and reconnect to Wi-Fi if the thermostat dropped the network.
- Keep your HVAC system well-maintained and monitor battery status quarterly to prevent premature drain and ensure your Nest thermostat operates reliably for years.
When To Know Your Nest Thermostat Battery Needs Replacing
Your Nest thermostat runs on a rechargeable AA lithium battery that tops up whenever your heating or cooling system cycles on. But if your HVAC doesn’t run often, say, in mild spring or fall weather, that battery can drain faster than it recharges.
Watch for these warning signs: a low-battery notification on the Nest app, a red light on the device itself, or the thermostat screen flickering. Some users report their Nest simply stops responding to commands or drops off the Wi-Fi network. Don’t ignore these cues. A dead battery means your thermostat can’t communicate with your heating system, leaving you without automatic climate control.
The battery typically lasts 2–3 years under normal conditions, though that timeline varies depending on how often your system runs and your home’s temperature swings. If your HVAC system cycles frequently, keeping the battery topped off, you might get longer life. In mild climates with minimal heating or cooling demand, batteries can drain in as little as 18 months.
Check your Nest app’s settings menu. Most models display the battery status there, often showing a percentage. Some versions include a battery-age counter. If you see “low battery” or anything below 20%, you’re approaching replacement time. Better to swap it out before the thermostat loses power entirely.
Tools And Materials You’ll Need
The good news: battery replacement requires almost nothing.
Materials:
• One AA lithium battery (specific type matters, see below)
• Optional: a small piece of painter’s tape (helps if you’re not comfortable handling electronics)
Tools:
• Your hands (seriously, that’s it)
• Optional: a soft cloth to clean the battery contacts
The critical detail: Nest thermostats require a non-rechargeable AA lithium battery, typically a Energizer Ultimate Lithium or equivalent like Duracell Ultra or Panasonic Lithium. Do not use standard alkaline batteries (like regular Duracell AA) or NiMH rechargeables. Alkaline batteries can corrode inside the device and fail unpredictably in cold. Rechargeables don’t hold the voltage your Nest needs and will trigger low-battery warnings constantly.
If you’re unsure which battery your Nest uses, check the original manual or Google’s support site. Nest Learning Thermostats (the round ones from 2011 onward) and Nest E thermostats both use AA lithium. Nest Thermostat (the rectangular, budget-friendly model released in 2020) also uses one AA lithium, though it’s designed to work with or without a dedicated battery, it can pull auxiliary power from your heating system’s C-wire if installed.
A single battery costs around $5–$8, so this is one of the cheapest home comfort fixes you’ll make.
Step-By-Step Battery Replacement Process
Removing Your Nest Thermostat From The Wall
-
Turn off your heating and cooling. Go to the Nest app or walk to the thermostat and set it to Off mode. This prevents the system from calling for heat or cool mid-replacement and keeps things safe.
-
Grasp the thermostat body firmly. The Nest is attached to the wall plate with a magnet (or light friction on some models). Hold it steady with one hand and gently pull toward you. Don’t yank, let it come away smoothly. The mounting plate stays on the wall.
-
Set it on a clean, flat surface. Lay the thermostat face-up. You’ll see the battery compartment on the back or side, depending on your model. The Learning Thermostat has the battery door on the lower back. The Nest E has it on the underside.
-
Slide or pop open the battery compartment. For most models, you’ll see a small plastic tab or seam. Slide it gently in the direction marked by an arrow (if present), or apply light pressure to pop the door off. No force needed, if it’s resisting hard, you’re pushing the wrong direction.
-
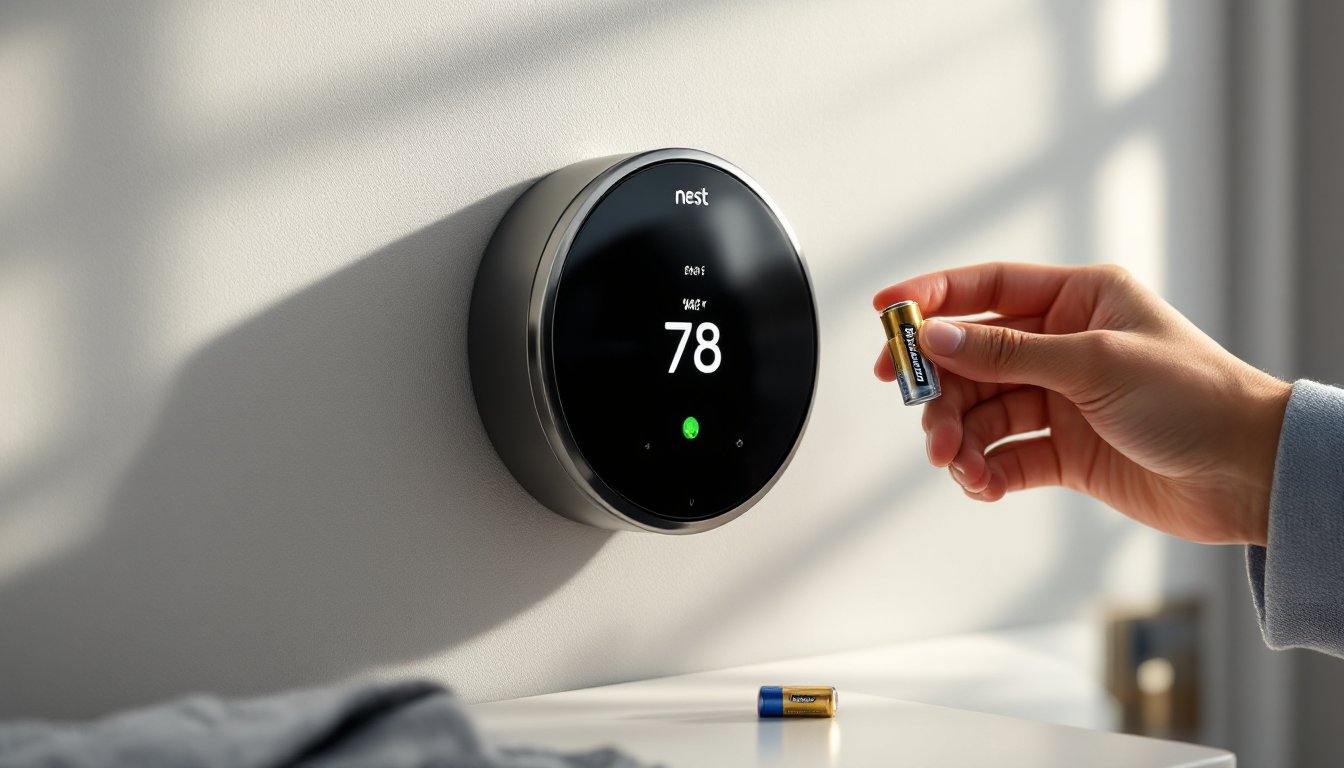
Note the battery orientation. Before removing the old battery, observe which end faces out: + (positive) or – (negative). The positive terminal should face outward in most Nest models. A small diagram is usually printed inside the compartment.
-
Remove the old battery. Gently wiggle and pull the battery straight out. If it feels stuck, don’t force it. Use a small bit of painter’s tape stuck to the top of the battery as a handle and gently peel it out.
Installing Fresh Batteries
-
Insert the new AA lithium battery with the correct polarity. Match the positive end facing outward, as the diagram shows. Slide it into the compartment smoothly. It should seat with a light click.
-
Close the battery door. Align the compartment cover and slide it shut or snap it back in place, depending on your model. The door should close flush with no gaps.
-
Return the thermostat to the wall. Line it up with the mounting plate and press it gently back into place. You’ll feel a magnetic click when it seats correctly. The thermostat should now show a solid green light or power indicator.
-
Turn your HVAC system back on. Use the Nest app or the thermostat itself to set your desired temperature and mode (Heat, Cool, or Auto). The system should respond immediately.
-
Verify the battery status. Open the Nest app and navigate to Settings > Technical Info. The battery level should now show 100% or “good.” If it still shows low, double-check the battery orientation and make sure you used a lithium AA, not alkaline.
Troubleshooting Common Battery Issues
Battery still shows low after replacement. The most common culprit is installing the battery backwards or using the wrong type. Pop the compartment open again and confirm the positive terminal faces outward. If you grabbed an alkaline by mistake, swap it for lithium immediately. Sometimes the app takes a few minutes to refresh: wait 5–10 minutes and check again.
Thermostat doesn’t power on or won’t connect to Wi-Fi. After battery replacement, your Nest may need to reconnect to your network. Go to the device settings, forget the Wi-Fi network, and reconnect using the app or the thermostat’s on-screen menu. If it still won’t connect, check whether your home has a C-wire (common wire) running to the thermostat. Some Nest models rely partly on auxiliary power from the HVAC system if the battery is very weak. A missing C-wire in very cold climates can cause power issues.
Battery drains in weeks instead of months. This suggests your battery contacts are corroded or your new battery is defective. Remove the battery, inspect the contacts inside the compartment for green or white oxidation, and gently clean them with a soft, dry cloth. Reinsert the battery and monitor. If it drains again quickly, try a different battery from a different brand or retailer, occasional manufacturing defects happen.
The thermostat screen looks dim or flickers. A dim display often means low power even after replacement. Confirm you’re using a fresh lithium battery and that all contacts are clean and making good connection. Gently remove and reinsert the battery to reseat it. If flickering persists, the device itself may have an electrical issue unrelated to the battery: contact Google Support for warranty service.
Most problems stem from battery type confusion or orientation mistakes. If you follow the steps above and use the right battery, you’ll rarely encounter issues. Resources like CNET’s guide on smart home troubleshooting cover broader device issues if your Nest still malfunctions after battery replacement.
Maintaining Your Nest Thermostat For Longevity
Once your battery is fresh, a few simple habits extend your thermostat’s life and reliability.
Keep your HVAC system well-maintained. A furnace or AC unit that cycles regularly naturally tops off your Nest battery. Annual professional service, filter changes, refrigerant checks, coil cleaning, ensures your system runs efficiently. This means consistent heating or cooling demand and a healthier battery. In mild climates, consider running your system in Auto mode rather than off during shoulder seasons: those brief cycles keep the battery charged.
Avoid extreme temperature swings. Rapid changes force your HVAC to cycle hard, draining the battery faster. Gradual adjustments, lowering the temperature by a couple degrees when leaving home, raising it when returning, give the system easier, less frequent runs. Use Nest’s scheduling and geofencing features to automate these adjustments without manual changes.
Keep the thermostat clean. Dust and pet hair can accumulate around the device and clog sensors, making your system work harder. Wipe the face and edges with a dry cloth every few months. Don’t use water or cleaners: electronics and moisture don’t mix.
Monitor battery status quarterly. Check the Nest app a few times a year, especially before winter and summer peaks. If you notice the battery percentage dropping faster than expected, say, 30% per month instead of 5–10%, replace the battery early rather than waiting for a low-battery alarm.
Verify your C-wire if applicable. If your home has a C-wire (common wire) connected to your Nest, it provides auxiliary power to support the battery. Make sure that wire is secure and undamaged. A loose connection means your Nest relies entirely on the battery, which drains faster. Loose wires also trigger Wi-Fi disconnections.
Following these habits ensures your Nest keeps humming reliably. Smart home reviews on Digital Trends regularly highlight how well Nest thermostats hold up with basic care, so you’re looking at years of worry-free operation with minimal maintenance.